Ansible Roles, Vault, CSV files and more
Tips to improve your Ansible Playbooks

General
Ansible has some tricks to advance your playbook syntax. We will make our code reusable by separating tasks and variables and secure them with Ansible-Vault. The playbook I focus on will create two tenants in ACI.
Roles
With roles you can group your playbooks and reference them easily through subtasks. My ansible directory is the standard path /etc/ansible. In this directory I create a new folder called roles. Now I create another folder named create-tenant in roles which will be our first role.
We will create a playbook under /etc/ansible and use the task roles.
/etc/ansible/create-tenant.yml
- name: create-tenant
  hosts: localhost
  connection: local
  gather_facts: False
  vars:
   ansible_python_interpreter: /usr/bin/python3
   aci_host: 192.168.15.81
   aci_username: admin
   aci_password: cisco123

  roles:
   - create-tenant
Next I will create a playbook under /etc/ansible/roles/get-tenant/tasks. When calling a role, Ansible will always check for a playbook named main.yml and execute it first.
/etc/ansible/roles/get-tenant/tasks/main.yml
---
- name: Include tenant yml
  ansible.builtin.include_vars:
    file: tnt.yml

- name: Create Tenant
  cisco.aci.aci_rest:
    host: "{{ aci_host }}"
    username: "{{ aci_username }}"
    password: "{{ aci_password }}"
    validate_certs: false
    path: /api/node/mo/uni.json
    method: post
    content:
      fvTenant: { attributes: { name: "{{ tnt['name'] }}", rn: "tn-{{ tnt['name'] }}", descr: "{{ tnt['desc'] }}", status: created }, children: [] }
  loop: "{{ tntgrp }}"
  loop_control:
    loop_var: tnt
I will use a yml file for my variables and store it in a new folder called vars.
/etc/ansible/rolescreate-tenant/vars/tnt.yml
tntgrp:
 - { name: 'TNT1', desc: 'This is TNT1' }
 - { name: 'TNT2', desc: 'This is TNT2' }
Now we can issue the command ansible-playbook create-tenant.yml and two Tenants will be created.
CSV files
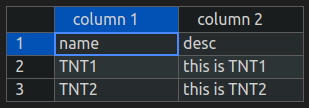
Instead of a YML file for the variables we can also create a CSV file. In VSCode there is a nice extension called Edit CSV from janisdd that lists our CSV files as a table. That makes it easier to work with.
/etc/ansible/rolescreate-tenant/vars/tnt.csv
name,desc
TNT1,this is TNT1
TNT2,this is TNT2
When we activate the Edit CSV extension in VSCode the file will display like this.

We have to change the main.yml a bit to import the CSV as list.
---
- name: Include tenant yml
  community.general.read_csv:
    path: roles/create-tenant/vars/tnt.csv
  register: tenants

- name: Create Tenant
  cisco.aci.aci_rest:
    host: "{{ aci_host }}"
    username: "{{ aci_username }}"
    password: "{{ aci_password }}"
    validate_certs: false
    path: /api/node/mo/uni.json
    method: post
    content:
      fvTenant: { attributes: { name: "{{ tnt.name }}", rn: "tn-{{ tnt.name }}", descr: "{{ tnt.desc }}", status: created }, children: [] }
  loop: "{{ tenants.list }}"
  loop_control:
    loop_var: tnt
Now we can issue the command ansible-playbook create-tenant.yml again and two Tenants will be created.
Tags
You can use tags to only run specific tasks in your playbook. Let us add another task which deletes our two tenants by changing the status to deleted and tag all tasks.
---
- name: Include tenant yml
  community.general.read_csv:
    path: roles/create-tenant/vars/tnt.csv
  register: tenants
  tags: create, delete

- name: create login alias for apic login
  set_fact:
      aci_login: &aci_login
        host: "{{ aci_host }}"
        username: "{{ aci_username }}"
        password: "{{ aci_password }}"
        validate_certs: false

- name: Create Tenant
  cisco.aci.aci_rest:
    <<: *aci_login
    path: /api/node/mo/uni.json
    method: post
    content:
      fvTenant: { attributes: { name: "{{ tnt.name }}", rn: "tn-{{ tnt.name }}", descr: "{{ tnt.desc }}", status: created }, children: [] }
  loop: "{{ tenants.list }}"
  loop_control:
    loop_var: tnt
  tags: create

- name: Delete Tenant
  cisco.aci.aci_rest:
    <<: *aci_login
    path: /api/node/mo/uni.json
    method: post
    content:
      fvTenant: { attributes: { name: "{{ tnt.name }}", rn: "tn-{{ tnt.name }}", descr: "{{ tnt.desc }}", status: deleted }, children: [] }
  loop: "{{ tenants.list }}"
  loop_control:
    loop_var: tnt
  tags: delete
Now if we issue the ansible-playbook create_tenant.yml --tags delete command it will only execute the tasks with the delete tag.
Alias
We have two tasks now that both use the same variables to authenticate. We can declare these variables in a specific task called aci_login and use it as an alias for other tasks.
---
- name: Include tenant yml
  community.general.read_csv:
    path: roles/create-tenant/vars/tnt.csv
  register: tenants
  tags: create, delete

- name: create login alias for apic login
  set_fact:
      aci_login: &aci_login
        host: "{{ aci_host }}"
        username: "{{ aci_username }}"
        password: "{{ aci_password }}"
        validate_certs: false

- name: Create Tenant
  cisco.aci.aci_rest:
    <<: *aci_login
    path: /api/node/mo/uni.json
    method: post
    content:
      fvTenant: { attributes: { name: "{{ tnt.name }}", rn: "tn-{{ tnt.name }}", descr: "{{ tnt.desc }}", status: created }, children: [] }
  loop: "{{ tenants.list }}"
  loop_control:
    loop_var: tnt
  tags: create

- name: Delete Tenant
  cisco.aci.aci_rest:
    <<: *aci_login
    path: /api/node/mo/uni.json
    method: post
    content:
      fvTenant: { attributes: { name: "{{ tnt.name }}", rn: "tn-{{ tnt.name }}", descr: "{{ tnt.desc }}", status: deleted }, children: [] }
  loop: "{{ tenants.list }}"
  loop_control:
    loop_var: tnt
  tags: delete
Ansible-Vault
You can encrypt your variables and create a file to decrypt it.
in this example I create the file .vault_pass with cisco as private key. Then I encrypt the cisco123 string and copy/paste the encrypted version in my playbook. I also change file ownership to root.
touch .ansible_vault && echo 'cisco' > .vault_pass && echo '.vault_pass' >> .gitignore
ansible-vault encrypt_string --vault-password-file .vault_pass 'cisco123' --name 'aci_password'
sudo chown root:root file #change file ownership to root
sudo chmod 600 file #only file owner has read and write permissions
sudo ansible-playbook create_tenant.yml --vault-password-file=.vault_pass
create_tenant.yml
---
- name: Create-tenant
  hosts: localhost
  connection: local
  gather_facts: false
  vars:
    ansible_python_interpreter: /usr/bin/python3
    aci_host: 192.168.15.81
    aci_username: admin
    aci_password: !vault |
      $ANSIBLE_VAULT;1.1;AES256
      31366662373630346366623034373939366463623437613563613032393338353830646639386466
      6635393465663362316534396532356338623064336336300a363663313535306439383533386538
      31343465633132343832633139393738623433363238323862633062613139323136383835666536
      3038636234656431350a653965663364376162356235306463343834303739346538653932353532
      3730


  roles:
    - create-tenant
Some helpful commands I use for Ansible-Vault debugging.
sudo whoami #check current user rights
ls -l .vault_pass #check file permissions
chmod -R -x+X .vault_pass #remove executable bit
sudo ansible-playbook create_tenant.yml --ask-vault-pass #type cisco when prompted
Here is the recursive directory listing of my folders with the command: tree
├── create_tenant.yml
└── roles
    └── create-tenant
        ├── tasks
        │   └── main.yml
        └── vars
            ├── tnt.csv
            └── tnt.yml
Thanks for reading my article. If you have any questions or recommendations you can message me via arvednetblog@gmail.com.